Your Cart is Empty


FAQs
Frequently Asked Questions
Q: What is the free sample code?
A: You can use code 3FREESAMPLES to get up to 3 samples for free! We just ask that you pay for shipping!
Q: Can I purchase full boards?
A: You can purchase individual full boards here on our website: https://www.wallplanks.com/collections/individual-full-boards
Q: How do I calculate square footage of a wall?
A: Take the base of your wall times the height of your wall to get total square feet.
Q: How do I calculate square footage for a triangular area?
A: Measure the length of the base of the triangle and the height of the triangle. To calculate the area of the triangle use the formula: (base x height) / 2. Multiply the base by the height and then divide it by 2.
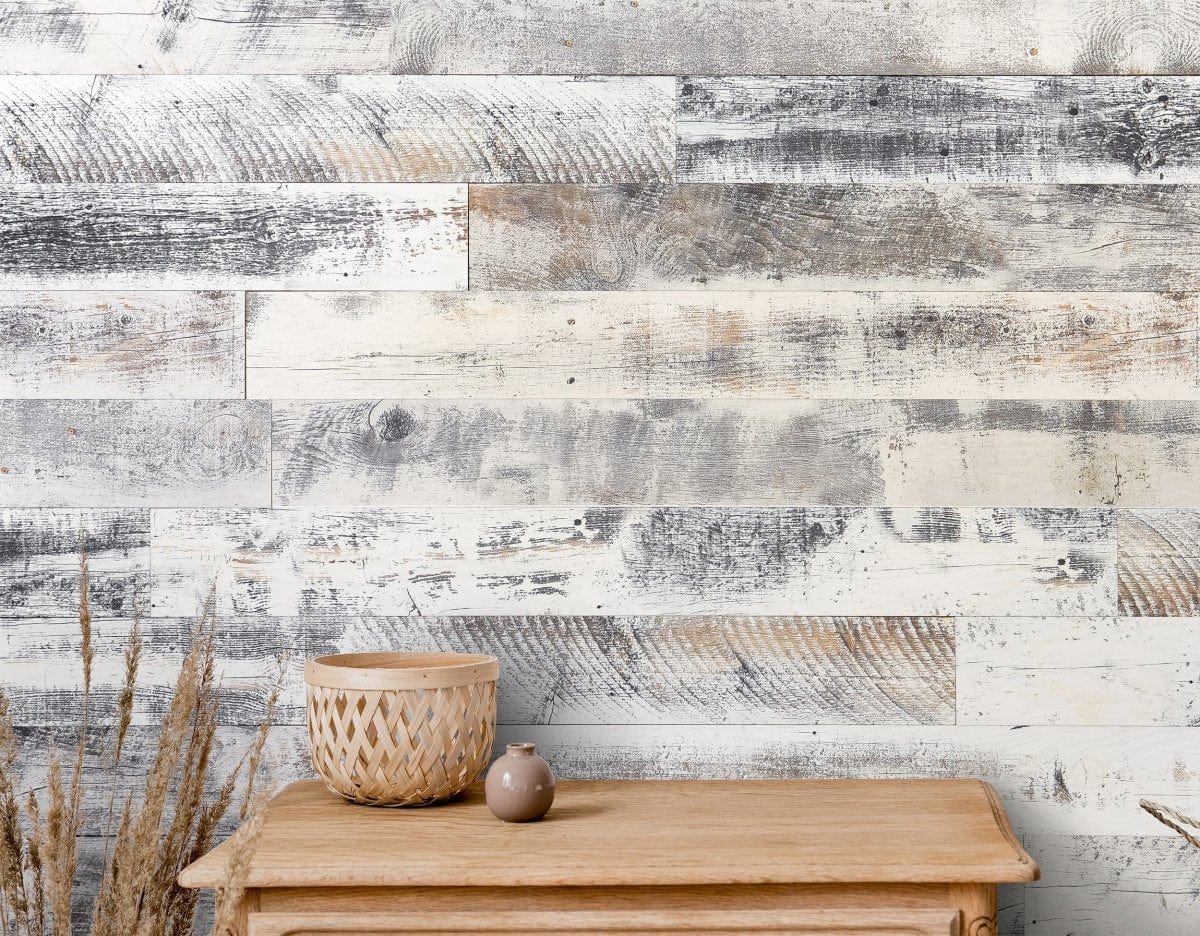
Q: What is the difference between Alabaster and Classic Shiplap?
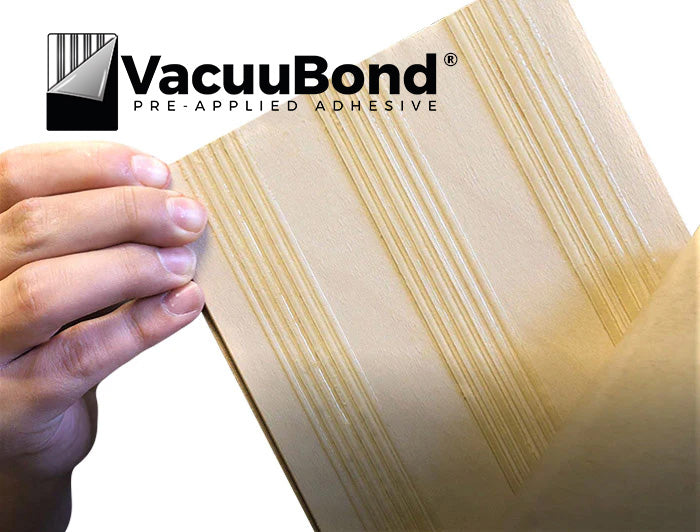
A: "The Alabaster Originals has an engineered hardwood veneer on an HDF core. You will see the natural grain of the wood behind the white face. These planks are 5.1"" W and have an interlocking joint profile. The Classic Shiplap has a bright, clean, white vinyl wrapped face on an HDF core. These planks are 7.44"" W and have the true nickle gap shiplap profile. Both options are peel and stick with our pre-applied adhesive."
Q: What Surfaces can wallplanks adhear to?
A: Wallplanks can adhere to any surface that is flat, clean, smooth, dry and structurally sound.
Q: Can Wallplanks adhear to tile?
A: Wallplanks can be installed on clean ceramic tile. Waxy, wet, dusty and dirty surfaces are the only surfaces that would cause adhesion issues.
Q: Are Wallplanks removeable?
A: Wallplanks are meant to be a permanent update to your walls. If you choose to remove the planks they could leave some damage to the wall underneath and/or cause paint chipping. The damage that is caused is not substantial and can be repaired easily with skim coating or spackle.
Q: How do you remove Wallplanks?
A: To remove Wallplanks you will need a putty knife or scraping tool, a heating device such as a hair dryer or heat gun, sand paper, cloth, water and TSP.
- Step 1: Use the heating tool on high heat while using the putty knife to slowly remove the plank from the wall. The heat will soften the adhesive and the putty knife will help scrape behind it to remove it. Do not move too quickly when removing otherwise the plank may snap.
*please note that the plank may cause some damage to the underlying wall and cause the paint to chip due to the strength of the adhesive. - Step 2: Use the putty knife to remove any excessive adhesive from the wall. The heating tool may also be helpful during this step
- Step 3: Use the sand paper to smooth any damaged surface/ chipped paint
- Step 4: Clean the wall with TSP and allow to dry completely
Q: How do I replace a board?
A:
- 1. Starting with an end of row plank, remove the wall planks up to the one that needs to be replaced
- 2. Remove the bad plank
- 3. Trim off the profile of the boards before replacing
- 4. Use either gorilla glue or nail planks back in place
Q: What kind of textured walls will Wallplanks adhear to?
A: It is recommended that all walls be tested with a sample prior to full installation. Heavy textured walls like knockdown or popcorn walls will require a skim coat application or sanding and scraping prior to installing Wallplanks. Plywood and unfinished drywall will require a coat of basic paint primer to be applied and dried first before installing Wallplanks. All other textured walls like crows feet, orange peel, smooth or swirl will should not require additional prep work.
Q: Can Wallplanks be installed on plaster walls?
A: Plaster surfaces should have a minimum of one coat of primer sealer prior to installation.
Q: Can Wallplanks adhere to vinyl?
A: Yes, Wallplanks can adhere to vinyl. As long as the surface is flat, clean, smooth, dry and structurally sound.
Q: Can Wallplanks be installed over paneling?
A: Yes, Wallplanks will adhere to paneling. Wallplanks will adhere to a clean, dry and structurally sound surface. It is recommended that all walls be tested with a sample prior to full installation.
Q: Can Wallplanks be installed over wallpaper?
A: Clean, Smooth, well-adhered wallpaper: This can be a base for Wallplanks. The installer must make sure the wallpaper is clean and firmly bonded to the wall before applying the wallplanks to the wallpaper.
Embossed wallpaper: The adhesive on the back of the wallplanks is 1/32"" thick. If the embossing on the wallpaper raises out more than that it is possible that the Wallplanks adhesion will be interrupted every time it goes over the embossing. This could result in less than a firm bond. The installer will need to test bond strength with several Wallplanks to ensure adhesive bond strength to the embossed wallpaper before proceeding with the entire installation. If bond strength is not sufficient, the wallpaper will have to be removed prior to installing the wallplanks.
Textured wallpaper: should be removed and the base wall cleaned with trisodium phosphate (TSP) before installing Wallplanks. To remove wallpaper there are steamers or wallpaper removal solutions available. These items plus the TSP cleaner are available in hardware stores or home centers.
Q:Can Wallplanks be installed over a mirrored surface?
A: Yes, Wallplanks can be installed over a mirrored surface as long as the mirror is smooth, flat, structurally sound and cleaned prior to installation and a J-roller is used when applying them.
Q: Can Wallplanks be installed on fireplace walls?
A: Follow local code. As long as the immediate surrounding of the fireplace opening is nonflammable Wallplanks can be installed on the sides of that, around and above.
Q: Can Wallplanks be installed as kitchen back splash?
A: Yes, Wallplanks make a beautiful updated kitchen back splash! They have been tested at temperatures of 140 degrees and the adhesive has stayed intact. You can see examples on the Charcoal Originals product page.
Q: Can Wallplanks be installed in bathrooms?
A: Yes, Wallplanks are water resistant and can be installed in a full bathroom. Additional nail down may be required.
Q: Can Wallplanks be installed inside shower walls?
A: No, Wallplanks should not be installed inside shower walls or right directly above the shower stall. Wallplanks are made from real engineered hardwood and are not waterproof.
Q: Can Wallplanks be installed on ceilings?
A: Yes, Wallplanks can be installed on ceilings. Our Wallplanks are one of the best products you can use for wall panel ceiling applications. Wallplanks are light weight, thin and very easy to apply. Just peel and stick to the ceiling, and then use brad nails as reinforcement per the installation instructions. There is no need to hold the plank in place while trying to nail because the pre-applied adhesive eliminates that headache!
Q: Can Wallplanks be installed outside?
A: No, Wallplanks cannot be installed in an outdoor setting. The veneer and HDF core is made from real wood and will therefore absorb moisture. Wallplanks are only approved for indoor installations.
Q: What tools do I need to install Wallplanks?
A: To install Wallplanks you will need a J-roller, TSP (trisodium phosphate) for cleaning sub wall, tape measure, 4' level, a straight edge, and a pencil. Possible cutting tools include a utility knife, hand saw, jig saw, circular saw, or miter saw.
Q: How do I prepare my walls for Wallplanks?
A: Clean & Dry the Wall surface. Turn off power to installation area while working around wall outlets and light switches. Remove electrical cover plates, protruding nails and loose paint. Sponge wash with TSP (trisodium phosphate), available in hardware stores or home centers, to remove residues of greasy grime, mildew, chalked paint or anything that might affect the bond of the VacuuBondTM adhesive. If wall has a heavy drywall texture, it will need to be block sanded and primed so the VacuuBondTM adhesive can achieve a firm bond. Wallplanks can be installed over well bonded smooth wallpaper. Textured wallpaper should be removed and wall cleaned with TSP prior to installing wallplanks. After the wall are thoroughly cleaned, the walls also must be thoroughly dried.
Q: Can Wallplanks be applied to drywall or plywood?
A: Plywood and unfinished drywall will require a coat of basic paint primer applied and dried first before installing Wallplanks.
Q: Are additional reinforcements (ie: nails) required when installing Wallplanks?
A: No, additional reinforcements are not required when installing Wallplanks as long as the installation instructions are followed. We have 100% confidence in the strength of our VacuuBond adhesive. If you elect to use nails as added protection when adhering your Wallplanks to the wall, any nails that come in contact with a stud would be more secure than nails that do not come in contact with a stud.
Q: How long does it take to install Wallplanks?
A: The length of time it takes to install Wallplanks depends on how big your wall is. A small accent wall would take no more than a few hours to complete. For larger walls, you could make a fun weekend project out of this!
Q: How do I install Wallplanks if my wall is uneven?
A: To install Wallplanks on an uneven surface you need to trace the uneven ceiling and or floor and rip cut your Wallplanks to fit the uneven surface.
Q: How do I cut Wallplanks to fit around an obstruction like a ligh switch, outlet, or vent?
A: Measure and trace the obstruction with a straight edge and pencil on the planks before removing the paper liner from the glue. Cut the traced obstruction space on the planks using a jig, hand or scroll saw. Place the cut Wallplanks over the obstruction to ensure a proper fit. Remove the release paper and install. Don't forget to use the J-roller.
Q: How do I stagger Wallplanks?
A: See our image below on how to stagger the Wallplanks. The rule of thumb is 12" minimum offset. The goal is to not repeat or line up offset lines for at least every 3-4 rows. Try to avoid having boards that are shorter than 12" in your pattern. https://tawk.link/5aabe77c4b401e45400dcb99/a/5bb3c0743835730e8e0fa8d7/553378e2cdbc20f86394ca4bbd769ee0732f558a/image.png
Q: Can I hang mirrors/artwork from the Wallplanks?
A: Wallplanks are not load bearing. Wall Décor like mirrors, pictures, shelves can be mounted by drilling through the Wallplanks provided the underlying wall provides sufficient support (i.e. wall studs). Use proper hardware to install any wall décor.
Q: Why are my wallplanks not sticking?
A: We are 100% confident in the strength of the VacuuBond adhesive and have not had any issues to date that have not been related to pre-installation sub wall preparation or failure to use a J-roller. Below is a list of a few reasons why this could be happening:
Solutions:
- 1. Secure the planks that are releasing by using a brad nail and a bit of filler putty or a furniture marker to blend in over the nails.
- 2. Secure the planks using another commercially available adhesive such as Liquid Nails, or Gorilla Glue to adhere to the planks where they have been released. Make sure to apply pressure for a good amount of time so the adhesive can properly bond. Additionally, I would like to elaborate that we are 100% confident in the strength of the VacuuBond adhesive and have not had any issues to date that have not been related to pre-installation sub wall preparation or failure to use a J-roller. Below is a list of a few reasons why this could be happening:
- 1. If a J-Roller was not used immediately after installing every plank on the wall, the adhesive did not get the opportunity to adhere to the sub-wall. VacuuBond adhesive is time and pressure-sensitive industrial-strength adhesive and a J-Roller is a very crucial step during the installation process.
- 2. If the sub-wall is not cleaned with TSP before your installation, there could but dirt, dust, grease, or grime that is making it difficult for the adhesive to adhere to the wall.
- 3. If the sub-wall is not completely dry before your installation, the adhesive will not adhere properly to the wall.
- 4. If the sub wall that you applied your Wallplanks to has a heavy texture, the planks may not adhere well. Surfaces with a heavy texture must either be sanded or skim coated and primed before installation to avoid adhesion issues. If you are installing on plywood, or unfinished drywall, those surfaces should have been primed before installation.
- 5. If the sub wall that you applied your Wallplanks to is not structurally sound, the adhesive may not adhere well.
- 6. If permanent HVAC is not maintained between 60 degrees and 75 degrees with a relative humidity between 30-55% for a minimum of 14 days before installation as well as during installation to ensure proper adhesion.
- 7. If there was not 1/4 “ expansion space left around the perimeter of the Wallplanks installation
- 8. If the Wallplanks are installed in a full bathroom and there was no additional nailing down.
Q: What is veneer?
A: The veneer is a thin decorative covering of fine wood applied to the front face and the back face of our environmentally friendly HDF core.
Q: What is the radius the boards can flex?
A: Classic Shiplap boards have a built-in feature called "Wall Flex" that helps each board to contour to slightly out of flat walls. The product is not designed to flex around or over architecturally contoured or curved walls.
Q: How do I remove excess adhesive on the Wallplank veneer?
A: "To remove excess adhesive from the Wallplank veneer simply use Goo Gone! Finishing nails should only be used for wood subwalls."
Q: How do I cover a corner of my Wallplanks?
A: We offer trim that can be nailed down. You can find trim by following this link to our website: https://www.wallplanks.com/collections/trim
Q: Can Wallplanks be installed around a round corner so they meet at a 90-degree angle? If so, how?
A: It depends on how round your corner is. If it is not too round, you can accomplish this by installing trim! What you can do is measure the corner to verify.
- 1. To measure, take a straight edge and put if flat to one of the walls so it is hanging at least 2” over the edge.
- 2. Then, take either a ruler or a tape measure and put it flat to the other wall.
- 3. Measure the distance from the end of the rounded wall to the 90-degree meeting point of the straight edge & ruler/tape measure. Please note this measurement and keep it handy. If the measurement is less than 1.25” then you should be able to accomplish this by installing two trim pieces on each wall.
- 4. When installing the trim, make sure you use the measurement you made note of to know how far into the trim piece you should nail. This is to ensure that you are nailing the trim down into the actual wall.
Q: Why do some of my Wallplanks look like they have the same pattern?
A: On most Wallplank sku's there can be some pattern repeat in about every 16th board.
Q: Are Wallplanks sound proof?
A: No, Wallplanks have not been tested to be sound proof. Wallplanks are acoustic dampening if an item were to hit the wall, similar to high heels on a hardwood floor, but no further testing or information is available regarding soundproofing.
Q: Which side is the tongue/groove? Which side goes up?
A: The tongue side of the board has a protruding ridge and the other side has a groove that the tongue fits into. When putting up the boards it doesn’t matter which side is up as long as the boards are consistent throughout the entire installation.
Q: Where do I start installing my Wallplanks?
A: You want to start where it is level. There are multiple ways you can establish your starting line. The most important aspect of establishing your starting line is to ensure that the first row of planks you install is 100% level. If your baseboard and ceiling are level, you can use one or the other to establish your starting line. If neither your baseboard or ceiling are level, you will need to establish a level line across the wall. With the use of a pencil and a 4' level, you can establish a starting line across your wall at eye level. DO NOT adhere the plank until you have it placed in the right position. Once the material is adhered to the wall it will be very difficult to reposition.
Q: Does your Vacuubond have a vapor barrier?
A: Vacuubond does not have a vapor barrier but we can sell a membrane primer which does if need be.
Q: What are the advantages of the Originals Collection in comparison to Stikwood?
A:
- 1. This product is far more durable and is even slightly flexible due to the fact that it is engineered. Those planks won't break easily.
- 2. The VaccuBond pre-applied adhesive is far more advanced and successful than peel and stick 3M tape and it takes less installation time to remove one single piece of release paper compared to 3 strips for tape. (https://vacuubond.com/)
- 3. This product is engineered in such a way that you will not need to worry about expansion or contraction with the shiplap edge profile.
- 4. No painting required! There are no holes in the planks so you do not have to paint the underlying wall prior to installation or use a touch up marker during installation.
- 5. The surface is smooth and easy to clean.
- 6. This product is UV cured which is a very effective cleaning procedure along with the fact that it prevents the product from fading, stains and wear.
- 7. 100% environmentally friendly and made in the USA.
Q: Can Wallplanks Originals be painted?
A: Yes, Wallplank Originals unfinished SKU's like Unfinished White Oak, Unfinished Walnut or Unfinished Maple can be painted or stained. All other Wallplank Original colors are pre-finished and cannot be painted.
Q: Can Reclaimed Wallplanks be painted?
A: No, our Reclaimed Wallplanks are pre-finished and cannot be painted. We offer 3 Wallplank Originals SKU's that are unfinished and can be painted. The unfinished SKU's are Unfinished White Oak, Unfinished Walnut and Unfinished Maple.
Q: Can Wallplank Dimensions be painted?
A: No, our Dimensions Wallplanks are pre-finished and cannot be painted. We offer 3 Wallplank Originals SKU's that are unfinished and can be painted. The unfinished SKU's are Unfinished White Oak, Unfinished Walnut and Unfinished Maple.
Q: Can Classic Shiplap Wallplanks be painted?
A: Yes, our Classic Shiplap Wallplanks are paintable (regular interior paint will work). We also offer 3 Wallplank Originals SKU's that are unfinished and can be painted. The unfinished SKU's are Unfinished White Oak, Unfinished Walnut and Unfinished Maple.
Q: Where do product materials come from?
A: Our raw materials are sourced throughout the USA and the final product is finished in Wisconsin.
Q: What is your return policy?
A: https://www.wallplanks.com/pages/return-policy
Q: Discount Matching
A: As per our return policy, we are happy to honor a previous sale price within 14 days from your date of purchase with the exception of Black Friday or Cyber Week promotions. Your price accommodation will be honored by providing a personalized online discount code you can use towards a future Wallplanks.com purchase. This discount code cannot be used in conjunction with a current sale of 35% or greater.
Q: How do I make a return
A: You can make a return by visiting the Return and Exchange Policy page on our website: https://www.wallplanks.com/pages/return-policy
Please complete the return request form at the bottom of the page.
Q: What should I do if I have Powder Post Beatles? Holes in my floor caused by bugs?
A: Kenny's response on 12/30/2020 : "I have seen what this customer has described before but it is extremely rare, in my 41+ years dealing with processed kiln dried lumber I have only come across this 2 other time and it turned out that it was not live power post beetles (PPB) that were creating a problem but they were dead and or mistaken identity to just pin holes in the wood. But to answer the question yes, there are rare cases of PPB but it’s usually in solid ¾” flooring when I have heard of it happening. New flooring is installed and finished, and then months or even years later, small holes develop. These are emergence holes made by adult beetles leaving the wood. Most hardwood floors have been dried and aged, but were part of a tree, and then board at one time. Since PPB only lay eggs in dead wood, the egg may have been laid in the mill or lumberyard, or in storage. Once the wood planks are shaped into actual flooring, the egg, or larval beetles may remain in the wood and finish their slow development. Depending on the species of beetle and the type and condition of wood involved, the duration of development may vary greatly. Once the adult beetles emerge inside your home, the will find few or any partners to mate with, and will be unable to lay egg on the finished surfaces of your flooring. Re-infestation is highly unlikely. One way to check for activity is to place a piece of tape over area of concern. If beetles are emerging, there will be holes in the tape. If no activity is noted, a little sanding and finish work will hide the holes. The rest of your home is not at risk. In any case involving Pest Control, it is always best to call a Pest Control Professional. I hope this helps."
Q: Do Wallplanks need time to acclimate
A: Per our installation instructions, to ensure proper adhesion and to avoid future movement such as gapping between boards and cracking on the face of the planks, permanent HVAC must be on and maintained between 60 ̊ - 75 ̊ F with relative humidity in the home between 30-55% for a minimum of 14 days before installation, as well as during and after installation. To accommodate for any changes in humidity, allow 1/4" expansion space for every 10' of the wall on all side. You do not have to acclimate the planks to the environment but you should acclimate the environment to be suitable for the installation of the planks. If you are concerned and would like extra assurance, you may use a nail gun and brad nails in addition to the pre-applied industrial strength adhesive on the back.
Q: Is the Baltic Birch made in the USA?
A: For as many as 60 plus years, North America has tried to make a well balanced plywood core substrate out of pine, fir, alder, basswood, spruce and so on. The challenge with North American manufacturers is they are able to produce the product, but having a consistent platform and having a well-balanced substrate on a consistent basis has been a huge challenge. Also, North American manufacturers of plywood typically slice all veneers under the Imperial dimensions, 1/10”, 1/8”, and so on. These thicknesses are too thick to build a strong balanced product. The consistency of moisture content with rotary peeled technology, are not tight enough standards for building a substrate for engineered flooring . The plywood manufacturers in North America are very good at building construction grade plywood panels as building materials for home construction, this also goes for Canada, as well as South America.
Q: Cold Temperatures/Cool weather
A: For the temperature - if you're worried about the cold, we recommend adding additional nails in your installation process. That can assure your Wallplanks stick to the wall. Our office administrator installed Wallplanks in her cabin, and they've held up very well despite the cold Wisconsin winters
Q: What is a good glue to use for installing in a basement over concrete?
A: All of our floorings can be floated, stapled, nailed, or glued down. If you would like to install by gluing over concrete and in a basement, we reccomend "Bostik's best vapor" due to the fact that it offers a vapor barrier and performs well over concrete.
Q: What is the difference between a BOGO 60 sale and a 30% off sale
A: the BOGO60 percentage-off deals for cartons will result in about a 30% deduction from the overall total. This is because you are recieving 60% off on half of your cartons and are paying full price on the other half. However, you actually save sightly more than 30% when you have an odd number of cartons on your order versus an even number of cartons. (this is because the odd numbered carton is automatically included in that 60% off)
Q: Can I use any of your wood plank products over a laminate countertop?
A: Yes, our wood planks (wallplanks) can be used over a laminate countertop or tabletop. However you must keep in mind that you may need to use an epoxy to finish it in order to maximize durability and minimize the likliness of gaps.
Q: What
A: Wallplanks come in lengths anywhere between 12"-47" with over 80% of the boards in a carton being the full 47" length.
Q: What makes From The Forest Wallplanks innovative/ better than our competitors?
A:
- Engineered from 100% REAL WOOD
- Engineered with "Wall Flex," an HDF core and completed with a front and back face veneer that is finished with WearMax - making the planks both DURABLE & FLEXIBLE
- Environmentally Friendly
- Engineered with a SHIPLAP EDGE so the surface behind the planks does not peek through regardless of a change in seasons and humidity.
- Proudly MADE IN THE USA- Central Wisconsin by From The Forest
Q: What are the advantages of the Originals Collection in comparison to Stikwood?
A:
- This product is far more durable and is even slightly flexible due to the fact that it is engineered. Those planks won't break easily.
- The VaccuBond pre-applied adhesive is far more advanced and successful than peel and stick 3M tape and it takes less installation time to remove one single piece of release paper compared to 3 strips for tape. (https://vacuubond.com/)
- This product is engineered in such a way that you will not need to worry about expansion or contraction with the shiplap edge profile.
- No painting required! There are no holes in the planks so you do not have to paint the underlying wall prior to installation or use a touch up marker during installation.
- The surface is smooth and easy to clean.
- This product is UV cured which is a very effective cleaning procedure along with the fact that it prevents the product from fading, stains and wear./li>
- 100% environmentally friendly and made in the USA.
Q: What are the differences between the Alabaster Originals and White Classic Shiplap?
A:
- The Alabaster Originals has an engineered hardwood veneer on an HDF core. You will see the natural grain of the wood behind the white face. These planks are 5.1" W and have an interlocking joint profile.
- The Classic Shiplap has a bright, clean, white vinyl wrapped face on an HDF core. These planks are 7.44" W and have the true nickle gap shiplap profile. Both options are peel and stick with our pre-applied adhesive.
Q: Are Wallplanks Originals California CARB compliant?
A: Yes, Wallplanks Originals are California CARB compliant with zero VOC's, from a NAF (no added formaldehyde) facility, and all raw materials are sourced from FSC (forest stewardship council) certified sawmills. We use top coats and stains that are water-based and UV cured to protect air quality. Our adhesives meet the highest standards for air emissions and we are TSCA Title VI compliant. There is no added formaldehyde to any of our products.
Q: What is HDF?
A: Also referred to as hardboard, a high-density fiberboard (HDF) is a type of engineered wood product. It's made from wood fiber extracted from chips and pulped wood waste. HDF is similar but much harder and denser than particle board or medium density fiberboard (MDF).
Q: What is veneer?
A: Wallplank veneer is a thin decorative covering of fine wood applied to the front face and the back face of our environmentally friendly HDF core.
Q: Can I purchase a half carton of Wallplanks?
A: We do not offer half carton options, however, we do offer individual full length boards 1.66 sq. ft. (5.1 W" x 47" L ). Please note discounts do not apply towards single board purchases. Free shipping is still available only if purchased with a full carton order.
Q: What is your standard shipping and lead time?
A: The standard lead time from the date of purchase is 7-10 business days via UPS. Orders are processed within 2-3 business days and free shipping delivers within 5-7 business days. Please note we have no control over small parcel & LTL carrier delays due to increased shipping demands and reduced capacity.
*UPS is environmentally friendly and ships Carbon Neutral
Q: What is the radius the boards can flex?
A: Wallplanks boards have a built-in feature called "Wall Flex" that helps each board to contour to slightly out of flat walls. The product is not designed to flex around or over architecturally contoured or curved walls.
Q: What is the maximum heat the Wallplanks adhesive will withstand?
A: Wallplanks have been tested at temperatures of 140 degrees and the adhesive has stayed intact.
Q: Do you offer Class A fire rated Wallplanks?
A: Yes we do offer Class A fire rated Wallplanks for surface burning characteristics of building materials. Class A certified products have been tested and proven to hold up longer against flame spread. Cost is an additional $3.00/SF. Minimum order quantity is 10 cartons (200 SF). Estimated lead time is 3-6 weeks. (The three week lead time is based on From The Forest available stock. For large installations that exceed standard stock levels, assume 6-8 weeks). Please inquire with an expert to place this order.Click here for our procedure for Class A Fire Rating.
Q: Can I request a custom color of Wallplanks?
A: Yes, we offer custom color runs for quantities of 3,000-5,000sf on our unfinished species. We request you send us an example of the color you would like matched for us to develop. You will then be asked to sign a document that commits to placing the order due to the high manufacturing costs of color matching. We then send you samples of the created custom color to review and agree upon. Once all parties agree, we will then proceed with production. Custom color requests for less than 3,000sf will be considered and pricing will vary by quantity requested. Please contact an expert to discuss pricing and lead time.
Q: Are additional reinforcements (ie: nails) required when installing Wallplanks?
A: No, additional reinforcements are not required when installing Wallplanks as long as the installation instructions are followed. We have 100% confidence in the strength of our Vaccubond adhesive. If you elect to use nails as added protection when adhering your Wallplanks to the wall, any nails that come in contact with a stud would be more secure than nails that do not come in contact with a stud
Q: Do you ship to Canada?
A: Yes, we do ship to Canada, however free shipping does not apply. The purchaser is the responsible party for all shipping costs, taxes, and duties.
Q: Can Wallplanks be installed in bathrooms?
A: Yes, Wallplanks are water-resistant and can be installed in a full bathroom. Additional nail down may be required. We do not recommend installing Wallplanks directly inside or above a shower stall. Wallplanks are made from real engineered hardwood and are not water-proof.
Q: Can Wallplanks be installed as kitchen back splash?
A: Yes, Wallplanks make a beautiful updated kitchen back splash. We recommend using our Wood Wall Covering Cleaner on pre-finished Wallplanks products.
Q: Can Wallplanks be installed in elevators?
A: Yes Wallplanks can be installed inside an elevator. As long as the elevator surface is flat, clean, and structurally sound. Be sure to follow the Wallplanks installation instructions. The elevator needs to follow proper code in order to pass inspection.
Q: Will the planks hold up in high humid locations like lake communities without warping or changing?
A: Wallplanks are made from 100% wood and are designed for interior installations only. For best long-term performance permanent HVAC should be on and maintained with a relative humidity to the home or business between 30-55% for a minimum of 14 days prior to installation as well as during and after installation. If you suspect a change in humidity, allow ¼” expansion space for every 10’ of the wall on all sides. Additional nail down may be required for high humid locations.
Q: What kind of textured walls can Wallplanks adhere to?
A: It is recommended that all walls be tested with a sample prior to full installation. Heavy textured walls like knockdown or popcorn walls will require a skim coat application or sanding and scraping prior to installing Wallplanks. Ply wood and unfinished dry walls will require a coat of basic paint primer applied and dried first before installing Wallplanks. All other textured walls like crows feet, orange peel, smooth or swirl should not require additional prep work.
Q: Can Wallplanks be installed on a cement or concrete surface?
A: Yes, Wallplanks can be installed on cement, a cinder block, or on a concrete surface. First you will need to either apply a coat of paint or primer sealer, or you can skim coat the wall, or sand and scrape the textured wall. Next make sure the surface is clean and dry. Once the surface is dry you can start installing Wallplanks according to the instructions.
Q: Can Wallplanks be installed over paneling?
A: Yes, Wallplanks will adhere to paneling. Wallplanks will adhere to a clean, dry and structurally sound surface. It is recommended that all walls be tested with a sample prior to full installation. We also recommend using a brad nailer in addition to the pre-applied adhesive for this type of installation. The reason for this is the existing wood paneling will expand and contract as well as the Wallplanks and the additional reinforcements will keep all planks in place.
Q: Sub walls are to be flat, dry, structurally sound and clean prior to installing Wallplanks. Define dry?
A: Moisture content of the sub-wall that is plywood or drywall should not exceed 11% using a pin-style meter. If sub wall is concrete or cinder block it should be dry using an ASTM 1869-89 Calcium Chloride test with the moisture content not exceeding 2.0 lbs.
Q: Can Wallplanks be installed on ceramic tile?
A: Wallplanks can be installed on clean ceramic tile. Waxy, wet, dusty and dirty surfaces are the only surfaces that would cause adhesion issues.
Q: How to store your wallplanks
Q: How long does it take to install Wallplanks?
A: The length of time it takes to install Wallplanks depends on how big your wall is. A small accent wall would take no more than a few hours to complete. For larger walls, you could make a fun weekend project out of this!
Q: Which shiplap edge should be used?
A: Wallplanks have a shiplap edge on both sides of the planks. You can start installing on either shiplap side/edge.
Q: How do I cut Wallplanks to fit around an obstruction like a light switch, outlet, or vent?
A: Measure and trace the obstruction with a straight edge and pencil on the planks before removing the paper liner from the glue. Cut the traced obstruction space on the planks using a jig, hand or scroll saw. Place the cut Wallplanks over the obstruction to ensure a proper fit. Remove the release paper and install. Don't forget to use the J-roller!
Q: How can I install Wallplanks in a chevron pattern?
A: To install Wallplanks in a chevron pattern, simply cut each plank at the required angle for your installation and match the planks up.
Q: How can I install Wallplanks in a herringbone pattern?
A: When installing Wallplanks in a herringbone pattern, you need to evaluate where the shiplap edge should be cut and removed. You can remove the shiplap edge using a jig, hand or scroll saw. Cuts are generally made at a 45 degree angle. A helpful hint is to router the ends that don't butt up for a smoother installation. Once you have your starting point, continue to add boards to the wall working your way outward. Once you finally get to the corners, you can use your scrap pieces.
Q: Can Wallplanks be installed vertically?
A: Yes! Simply follow the same instructions, but begin your starting line vertically instead!
Q:
A:
- The Classic Shiplap has a bright, clean, white vinyl wrapped face on an HDF core. These planks are 7.44" W and have the true nickle gap shiplap profile. Both options are peel and stick with our pre-applied adhesive.
- The Alabaster Originals has an engineered hardwood veneer on an HDF core. You will see the natural grain of the wood behind the white face. These planks are 5.1" W and have an interlocking joint profile.
Q: Turn Down The Noise Test Results
Q: What is the difference between Originals and Reclaimed Odyssey? Why do Originals cost more?
A: The Originals have a real wood veneer, front and back face, with an HDF core. The Reclaimed Odyssey collection is strictly HDF with an engineered profile. Additionally, priming, printing and reversed embossing techniques are applied to the face which creates a reclaimed visual aesthetic.